> For the complete documentation index, see [llms.txt](https://help.highlight.net/llms.txt). Markdown versions of documentation pages are available by appending `.md` to page URLs; this page is available as [Markdown](https://help.highlight.net/admin/pending-snmp.md).

# Pending SNMP

Edit and activate SNMP watches which are not yet live in Highlight

## Overview

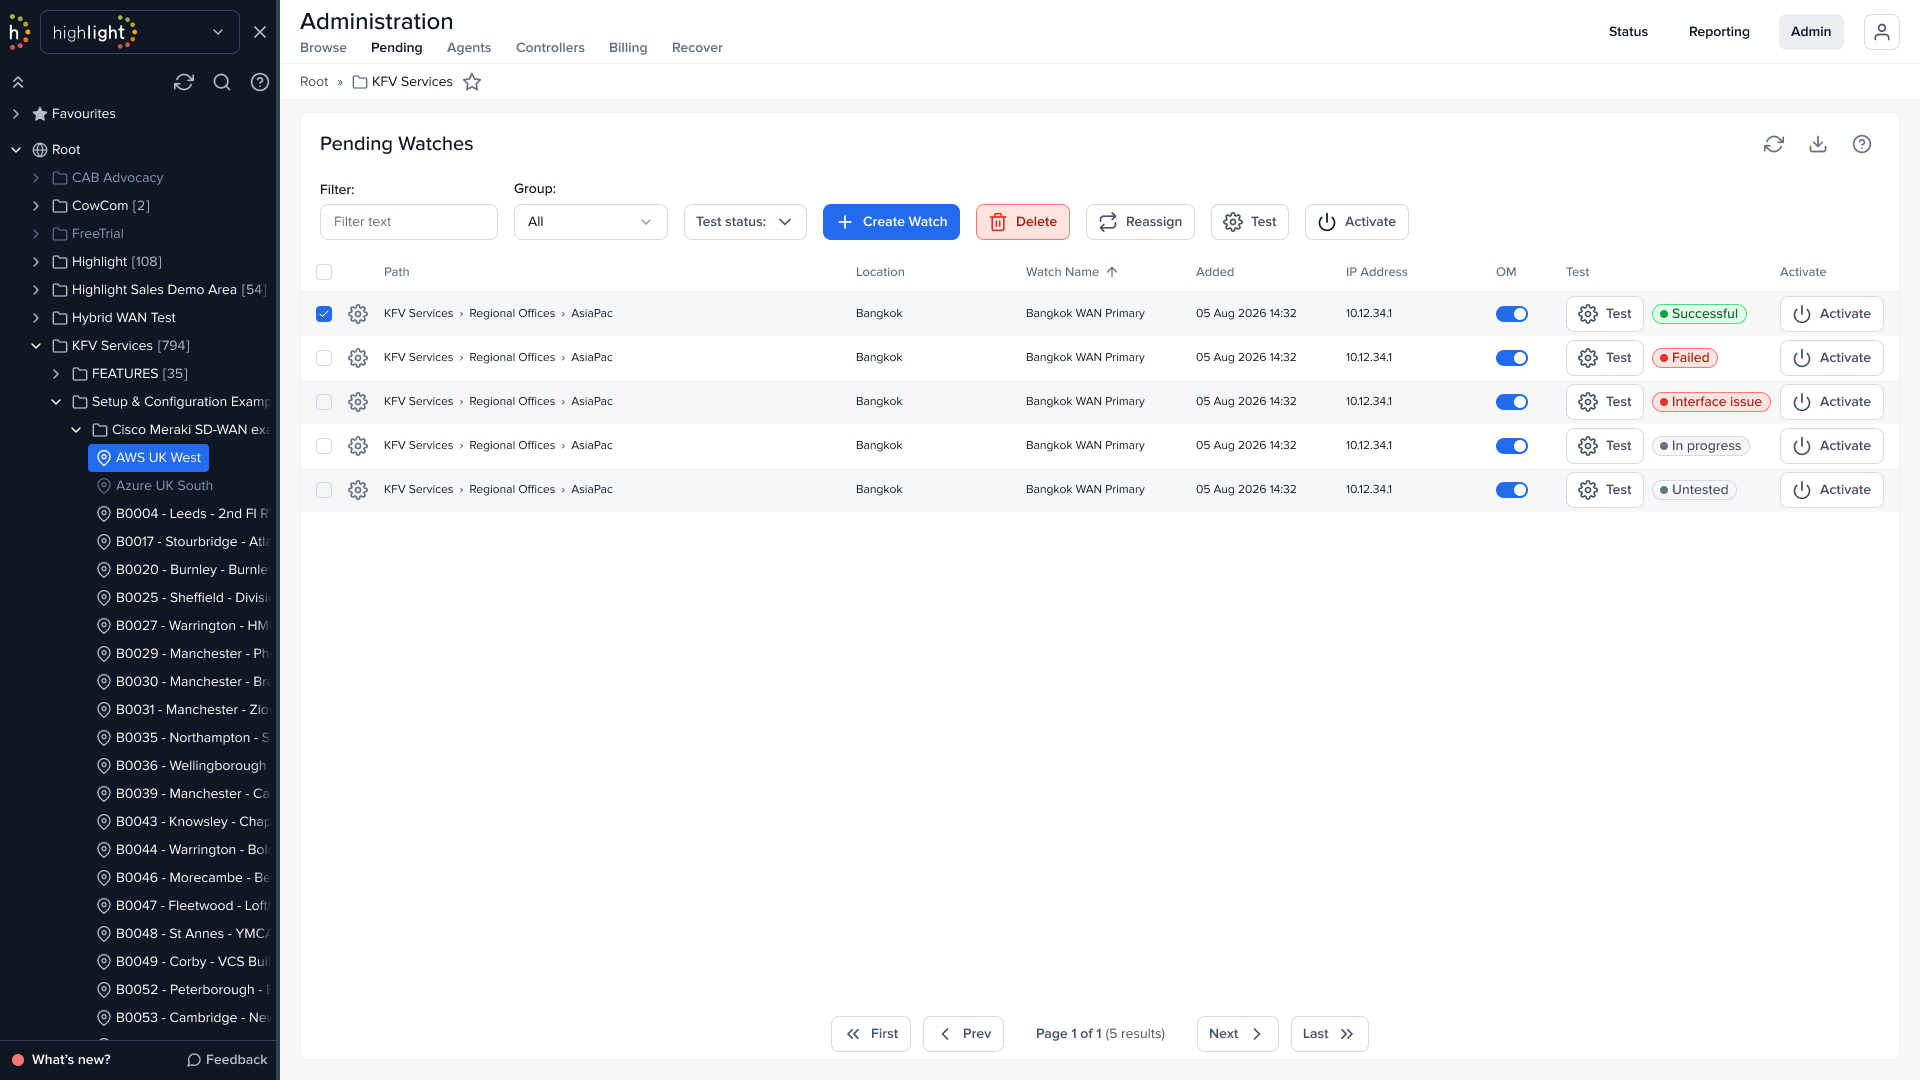
The Admin Pending page shows details of all pending watches in or beneath the folder selected in the Network Explorer tree. These watches are not currently live in Highlight so not yet being monitored.

<figure><picture><source srcset="/files/eQy6u9zxGGhz0zoTJodT" media="(prefers-color-scheme: dark)"><img src="https://25768351-files.gitbook.io/~/files/v0/b/gitbook-x-prod.appspot.com/o/spaces%2F68Wb63XzG9guH74bkPEb%2Fuploads%2FsFYJ6xvmho0KgbZcpN99%2Fadmin-pending-light.png?alt=media" alt="Admin Pending"></picture><figcaption></figcaption></figure>

Find out more about [creating or editing a watch](/admin/admin-page/watch-snmp.md).

## Controls

At the top right of the panel:

<table><thead><tr><th width="113">Control</th><th>Description</th></tr></thead><tbody><tr><td><strong>Refresh</strong></td><td>Refresh the page, especially useful if tests are showing as <strong>In progress</strong></td></tr><tr><td><strong>Download</strong></td><td>Download the information in the table to a CSV file. The download respects the current filter settings</td></tr></tbody></table>

Filter the table using:

* **Filter:** watches from the currently displayed group are filtered according to the text in the Path, Location, Watch Name or IP Address fields
* **Group:** use the drop-down list to display watches from a particular group
* **Test status:** use the drop-down list to view watches in one or more test states — **Untested**, **In progress**, **Successful**, **Failed** or **Interface issue** (see Test states below). Use **Select all** to check or uncheck all states at once.

**Create Watch** creates a new watch in the pending list — see [creating or editing a watch](/admin/admin-page/watch-snmp.md). This button will only work if a location (or folder containing the target location) is selected in the Network Explorer tree.

If the box on the left of one or more watches is checked, the following four buttons appear at the top of the page and apply to all selected watches:

<table><thead><tr><th width="101">Button</th><th>Description</th></tr></thead><tbody><tr><td><strong>Delete</strong></td><td>Remove selected watches permanently from the pending list</td></tr><tr><td><strong>Reassign</strong></td><td>Move selected watches to another group — enter an existing or new group name</td></tr><tr><td><strong>Test</strong></td><td>Technically test selected watches to confirm the configured IP address(es) with security credentials provided are reachable and responsive</td></tr><tr><td><strong>Activate</strong></td><td>Make selected watches live in Highlight and start polling</td></tr></tbody></table>

## Pending Watches Table

It may be useful to sort the list so all untested or inactivated watches can be processed together. Sort by clicking on a column header — an arrow indicates ascending or descending sort order. It is not possible to sort by IP Address.

Click on any line to view or edit details of that watch.

The table shows 50 watches per page — use the pagination controls at the bottom of the panel to move between pages.

The columns are:

<table><thead><tr><th width="129">Column</th><th>Description</th></tr></thead><tbody><tr><td><strong>Checkbox</strong></td><td>Use to select all or a subset of watches</td></tr><tr><td><strong>Edit</strong></td><td>Use to view or edit details of the watch</td></tr><tr><td><strong>Path</strong></td><td>The folder path for the location</td></tr><tr><td><strong>Location</strong></td><td>Position in the network tree</td></tr><tr><td><strong>Watch Name</strong></td><td>A unique name provided when the watch was added to the pending list</td></tr><tr><td><strong>Added</strong></td><td>The date the watch was added to the pending list</td></tr><tr><td><strong>IP Address</strong></td><td>Internet Protocol address</td></tr><tr><td><strong>OM</strong></td><td>Order Management — what is shown depends on your permissions, see below</td></tr><tr><td><strong>Test</strong></td><td>Click <strong>Test</strong> to technically test the watch from this page. Hover over the button to see a summary of the device's IP address, SNMP credentials and selected interface. The current test state is shown alongside the button — see Test states below</td></tr><tr><td><strong>Activate</strong></td><td>Once a watch has been created, approved and successfully tested, with an interface selected, make it live by clicking <strong>Activate</strong>, which removes the watch from the pending list and sends an email (from the <strong>noreply@highlight.net</strong> address) to the <strong>Contact name</strong> for the folder. The button is unavailable if the watch has not been approved by Order Management or if the test has not been successfully completed</td></tr></tbody></table>

### Test states

* **Untested** — the test has not yet been attempted
* **In progress** — the test has started but not yet completed
* **Successful** — the previous test succeeded
* **Failed** — the previous test failed
* **Interface issue** — no interface was selected following a successful test, or a previously selected interface is currently unavailable

### OM (Order Management)

What is shown in the OM column changes based on user permissions:

* **Approve new watches** — with this permission you see a toggle: switch it on to approve the watch, or off to remove approval
* **View pending list** (without **Approve new watches**) — you see a green tick or a red cross depending on whether the order has been approved by another user

## User Permissions

{% hint style="info" %}
The permissions **View pending list**, **Approve new watches** and **Activate new watches** control what you can see and do on this page — see [User permissions](/admin/admin-page/user.md) for full details.
{% endhint %}

If you do not have the permission **Approve new watches**, then only a green tick or a red cross will show under OM (Order Management).

If you do not have the permission **Activate new watches**, then the **Activate** buttons will be inactive (greyed out).

## Related

* [Creating a watch](/admin/admin-page/watch-snmp.md)
* [Troubleshooting new watches](/troubleshooting/new-watch.md)


---

# Agent Instructions
This documentation is published with GitBook. GitBook is the documentation platform designed so that both humans and AI agents can read, navigate, and reason over technical content effectively. Learn more at gitbook.com.

## Querying This Documentation
If you need additional information that is not directly available in this page, you can query the documentation dynamically by asking a question.

Perform an HTTP GET request on the current page URL with the `ask` query parameter, and the optional `goal` query parameter:

```
GET https://help.highlight.net/admin/pending-snmp.md?ask=<question>&goal=<endgoal>
```

`ask` is the immediate question: it should be specific, self-contained, and written in natural language.
`goal` is optional and describes the broader end goal you are ultimately trying to accomplish on behalf of the user. GitBook uses it to tailor the answer towards what is most useful for that goal.

The response will contain a direct answer to the question and relevant excerpts and sources from the documentation.

Use this mechanism when the answer is not explicitly present in the current page, you need clarification or additional context, or you want to retrieve related documentation sections.